Showing posts with label tutorials. Show all posts

Tuesday, March 14, 2017

Bakery counter

This was meant to be the bonus video for last week, but life happened and I was unable to post it until now - so with a slight delay, the bakery counter is up as a video :)
To keep the video from being too long, while stilling including a couple of accessories for the 'bakery theme' I chose to include some simple shelves and a blackboard/chalkboard.


I am planning on making this a permanent scene that I can use when taking pictures of miniature food - Not with the garden table, and not the wallpaper either, that was just for the sake of this photo :)

Saturday, March 4, 2017

Shrimp fried rice

Today's tutorial on 'SugarCharmShop Gourmet' is for some simple shrimp fried rice.
- I also included some extremely simple chopsticks and a quick to make placemat :)

Not much else to say ^^

Click to watch the video


Hope you're having a great weekend so far! :)

Saturday, February 25, 2017

Pancakes

One of the first pieces of miniature food I made were pancakes - not the thick/american style ones but closer to crepes (what we consider normal pancakes here). I find that, especially in the beginning, you tend to make foods that you personally like to eat.. You'll then, as time passes, venture in to a world that offers a larger variety of food, making new textures and discovering preferences as to what you enjoy making the most.
Sometimes it's nice to revisit the feeling you get from making those certain, I guess ''comfort foods'', and so since it's been requested quite a few times, I decided that today's video on 'SugarCharmShop Gourmet' should be for pancakes :) 


In the tutorial I'm going to show you how I made the pancakes as well as a basic frying pan. Originally I thought of adding blueberries on the side - but seeing as the video was already pretty lengthy I decided to stick to this simple arrangement.

Sunday, February 19, 2017

Lettuce & more on the copycat issue

Today's tutorial on 'SugarCharmShop Gourmet' is for lettuce :) This is a fairly simple project - it doesn't require too much time or too many different materials - and it adds such a nice pop of color to any miniature scene. Fruits and vegetables is something I love to make in miniature because it's so colorful - it makes you happy!

Click here to watch the video


On the post I made around a week ago about being called a copycat, I received a comment, which was written in such a nasty way that I chose to delete it. I still have the comment, but I'm not going to go through the different 'paragraphs' of reasons why this person called me a liar.
And before I get further into this, you might wonder; why even address it?. Because, in a situation like this, there's no winning. If I don't address it, that means I'm trying too hide something, right? which makes me a liar. And if I do address it, I'm trying to hard to defend myself, which also makes me a liar. So my reason for addressing is that what I wrote in that post is the truth, and the comment I received were a bunch of assumptions - all of which were false and to be honest, fairly silly.
One of the examples used were some cherries I made back in 2014 - the person claimed those to be a copy of another miniature artist's work. As I've mentioned countless times I'm inspired by real food or pictures of real food - so though I'm sure there's no reasoning with those who want to believe I'm lying, I wanted to show you a picture of the cherries I made together with the photo I was inspired by;

I don't own this picture - it's one of the many food photographies I found and keep on my computer for inspiration.
In my version I took inspiration from the blue and white enamel bowl, the denim fabric that the bowl is placed on and the rustic wooden surface.

I am aware that there will always be people who won't believe me, or people who are not interested in having actual evidence to support their statements. And if you don't like me or my creations, there's not much I can do to change that.
Just know that when there are so many miniature artists in the world, all working within the same categories and all inspired by real life, the different seasons, holidays etc.- they're bound to make things that look similar, even if they weren't inspired by someone else's piece. When fall and Halloween rolls around, everyone makes pumpkins. For thanksgiving it's turkey, candy canes and gingerbread houses for Christmas and so on.

Another reason why I'm choosing to address this in this post is because after I had finished recording this week's tutorial (lettuce) I decided to search for lettuce tutorials on YouTube. Why? to torture myself I suppose, or to prove a point.. There are only so many ways you can make something and I did find one using CLOSE to the same technique I just used in my video. I hadn't seen this video before, I didn't copy this person or their technique - I just made the lettuce the only way I could come up with in order to get the effect I wanted. I've used these techniques in videos before. (Please refer to the video for more information about the techniques I recommend and don't recommend for making lettuce).
The thing is, that after seeing the other video, I was actually reconsidering even posting the video I made, which is silly since I hadn't seen it beforehand. And as I explained in the tutorial, there are reasons why I chose to use certain techniques over others. So my only other option would be to never post a lettuce tutorial - which is also ridiculous.

But how can the techniques then be so similar? - because again, there are only so many ways you can do something, and even fewer ways to get particular/exact effects. It is close to impossible to make something that none of the other 7.5 billion people in the world has not yet thought of. If we had to search on YouTube, Google or various social media platforms every time we wanted to make something, to make sure it hadn't been done before, we would never be able to do anything.
I won't be addressing this in future posts, because I'd much rather spend time creating and sharing. And in the name of 'sharing the love' I'll list a few of my favorite instagram accounts when it comes to inspiring food photographies (feel free to go through my entire list of the people I follow @SugarCharmShop - lots of delicious food/decor inspiration)

@dennistheprescott - His capability to make any food look scrumptious is outstanding. Even cheese platters and sushi, which are 2 things I don't eat ;D
@annagarciafrigola - photographer/stylist - beautifully arranged food.
@wagyu_beef - I follow a couple of accounts that post mainly raw meat due to my love for butcher's themed stuff.
@still_life_gallery_ - Exactly what the name suggests. Beautiful and harmonic scenes.

Anyway, Hope you'll enjoy the tutorial - I will be using lettuce in an upcoming video together with the cucumber from a previous video - just need to post another component first :) 

Sunday, February 12, 2017

Simple Roses

Tutorial for today on 'SugarCharmShop Gourmet' is for some simple roses in celebration of valentine's day coming up Tuesday :)


I am planning on making more flowers as they look great in the background of photos. Some of them might be listed on Etsy at some point, but I'm mostly making them to keep for the photos - just like the green plant you've seen in quite a few of my videos already. And for those of you who are only interested in the food tutorials on the new channel; don't worry, the majority of the non-food videos, including this one, are uploaded as bonus videos - so you're not missing out of any food tutorials :)

I bought chocolate to use in the photo,.. so you'll have to excuse me while I take on the 'super difficult task' of eating it ;)

Wednesday, February 8, 2017

Happy Birthday!!! - to meeee

In my last video I asked you guys to give the video 'thumbs up' if you'd like to see 2 videos this week and I'm happy to say, that there will be 2 videos! :) In general - the more support the videos receive, the more time I'll be able to set aside for 'SugarCharmShop Gourmet', and that's why, as I've mentioned before, that even if I upload something you personally might not be all that interested in - watching the video, clicking the thumbs up button and leaving a comment still really helps the channel!

Yesterday was my birthday, so for today's tutorial we're making a simple birthday cake :)
I'm not a huge fan of the fancy fondant cakes - I much prefer these more 'home-baked' looking cakes ^^


The second video of the week is going to be somewhat valentine's themed and will be up this weekend :)

Thursday, February 2, 2017

Miniature mac & cheese

Today's tutorial on 'SugarCharmShop Gourmet' is going to be a pretty simple and much loved dish; Macaroni and cheese. It's been requested quite a few times both before and after I started the new channel, and even though I personally don't find it that appealing, I do understand why so many people love it.

I chose to make the baked version because,.. let's be honest; mac & cheese is basically goo. and in miniature, that 'goo' is going to look even less interesting - so the baked top adds a little extra something, haha.


I do have an old tutorial on my main channel showing how to make this type of cooking dish from polymer clay, and I might make an updated tutorial on my new channel at some point :) The one I used in the tutorial however, is one of my ceramics.

Tutorial for the green plant that appears in quite a few of my pictures - as well as the 'kitchen setup' can also be found on my main channel, in case some of you are wondering :)

I'm currently in the process of doing some more test firings of ceramics,.. can't tell you how much I HATE experimenting when it comes to new clay and new clear glazes... I love making ceramics, and I love the final result, but I could do without the testing -.-'' so *yay* for me - now I have to wait another 2-4 months before I'll feel somewhat comfortable using the new pieces.

Sunday, January 29, 2017

Garden Table

So,. I wanted to make a vintage, garden type furniture, heavily patinaed table that I can use for photos. I really want to make a small scene/background to match it as well, so hopefully I can get that done soon.
But basically - I want to, and have been wanting to make some flowers, potted plants and a few other projects like that for quite a while and instead of just having them on a plain background, I wanted to be able to 'pose' them properly.

The tutorial for this table will be up on 'SugarCharmShop Gourmet' and this is where the channel might be a bit confusing - if you haven't read the original blog post which goes through all of that, I do recommend reading it; Click to read.


The design of this table, other than the engraved details, is kept pretty simple and is easy to make if you have the supplies. The patina in itself, and also the pattern on the table top adds so much detail that I didn't see a need to dress up the rest of the table with tons of swirls and additional details.


Monday, January 23, 2017

Miniature croissants

With a slight delay, next project for 'SugarCharmShop Gourmet' is ready :)
In this video I'm going to show you how to make croissants and a cute, vintage looking wooden tray, which I think goes perfectly with the pastries. I also decorated the tray with some simple lavenders - I did record a tutorial for these, but I'm not sure if they'll be up as the next project, and I definitely want to add another flower in the same video.


I love simple arrangements like these where you get to see each component a lot more clearly, and though the lavenders are super simple, I love what they add to this little scene as well!

Saturday, January 21, 2017

Kitten, Gourmet & Etsy

Yesterday's tutorial on my main channel was for this adorable, little ginger kitten. I was trying to avoid making anything animal themed when I realized how many of my recent tutorials have been including animals - not that I mind, but I'm sure a lot of people wish to see other things as well :)
The reason why I decided to make one anyway is because I want to post the video for different cat accessories next week, and it makes more sense if I actually have a cat to pose with those things, right?


I also listed a few more things on Etsy, and I do want to make a quick note to any danish readers;
Because I'm listing things on Etsy again, I might not be going to any more miniature fairs. I can't say for sure if I'll be doing the october fair this year, as the final one - depends if I'll have enough to fill up my stall. I was hoping on being able to maybe fill up a good portion of a stall with ceramics, but I'm not sure yet.
I will also be posting a tutorial on SugarCharmShop Gourmet either today or tomorrow - I was going to make a project using the cucumber cane from my last video, but I realized I need to make another video to go with that project, before I can post it.. So I'll be postponing that video for a couple of weeks. I just don't want to clutter each video with a bunch of items that'll then make it more difficult for my viewers to find the different 'components' at a later time, so I'm doing my best to keep most things seperate - though I will be combining items like the heart shaped bundt cakes and cooling racks, for some videos :)

Saturday, January 14, 2017

Cucumber

For today's video on SugarCharmShop Gourmet we're going to make miniature cucumber, as we'll need some cucumber slices for the next project :)

Cucumber canes are pretty simple and quick to make, and they're super useful whether you're making salads, burgers, sandwiches or other goodies!
And, if you're new to cane making, this is definitely one to try out.

Click here to watch the video

Next week's tutorial will be up later in the week due to the furniture delivery I was talking about in the last post - but hey, seeing as this is the second tutorial of the week, that still mean you got a bonus video :)

I'd love to take a moment to thank everyone who has subscribed to my new channel - though I'm sure not a lot of you follow the blog, just know it means the world. Starting a new channel is always a challenge (in many ways) - but I am overwhelmed by the support I've received so far!

Saturday, March 30, 2013

Quick tutorial; Lettuce

Lettuce for polymer clay creations and miniatures

Lettuce is one of those things that you can use to decorate almost anything, seriously, anything! With the exception of cakes, ice cream, candy and... okay, so maybe not anything - but a lot of things.
I love using lettuce to decorate arrangements of meat, fish, cheese etc.
You can use this technique to make lettuce for your 1:12 scale miniatures, charms or other polymer clay creations :)


-->

Materials needed;
-Polymer clay in a lettuce color (various shades of green, white etc. can be used for this)
-Mold maker (I'm used Amazing mold putty)
-Sharp blade or exacto knife
-Mixed tools (embossing tools, craft knives etc.)


When making lettuce, I like to use various shades of green to achieve a more lifelike appearance. I use a mixture of different green shades, white (Cernit) and sometimes even 'champagne' or 'sahara' for mixing in with the green to 'dull' the "neon"-like-briiiiiight-ness.
Next you'll need to make some molds that can be used to make the texture of the lettuce - In the picture above you can see 3 of the ones I've made. They're actually really easy to make; Prepare a small amount of mold putty, roll it into a ball and flatten it (you'll need to work pretty fast). Use various toold to make the texture; emossing tools, needles, clay blade, tin foil - whatever you have lying around. It doesn't have to be perfect, and it doesn't have to follow a specific pattern. You'll need to make 2 for this method :)

Slice off some very thin pieces of green clay and place them on top of one of the molds. Place the other mold on top and use your hand or fingers to add pressure.
Then simply remove the top mold! - fresh, yummy (clay) lettuce, ready to serve! :)

Sunday, February 24, 2013

Tutorial: Paper rose

1:12 scale miniature flower: Paper rose


-->

Hey! hello, how are you? long time no see!
A lot of things have happened the past few weeks, and it's been hard for me to find a balance between crafting, blogging and making YouTube videos - I've started making nail art videos again after a 1-year break! so glad to be back on there :) You can check out my videos if you're interested: 3TanjaJ3.

Anyways, here's the first flower tutorial. It should have been posted in January,.. oh well.

Materials needed:
-Paper
-Watercolors
-Paper punches (or scissors if you're going to cut the shapes yourself)
-Embossing tools, or any rounded tool
-Glue
-An eraser or something similar (rubber-ish)
-Green wire, preferably paper wrapped.

Tweezers, exacto knife + matte and glossy glaze are some more tools that can come in handy for this. You can use other tools and materials if you want - you might also need other things when making different types of flowers. I'll be showing you how to make an easy, basic rose.

1) - Begin by painting a piece of paper on both sides. It doesn't have to be perfect at all - a slobby paint job often looks better for petals because of the variation in color.
2) - Cut out petals with a paper punch or scissors. I used a heart shape for these. Use an embossing tool and your 'eraser' to shape the petals. I'm actually using a piece of amazing mold putty that I shaped into a circle :)
3) - Add a bit of glue to the wire and wrap around the first petal. Now continue adding petals till you're happy with it.
Repeat - add more petals :)
I used another paper punch for the leaves, but painted the paper green instead. If you want, you can add a lot more details and create the look of veins etc. To finish off the rose I touched up the color on the petals and added a thin layer of glaze.


Friday, January 18, 2013

Tutorial: Piece of toast/ Slice of bread

Tutorial; Piece of toast in 1:12 scale miniature

For dollhouses or use for charms

I'm back! I know, this should have been up Wednesday? - technical difficulties, literally. This is a very quick and simple tutorial, but there are a couple of reasons why I'm posting it. Firstly, I used to have a tutorial for small "lunch sandwiches" on my YouTube channel, but all the tutorials I have on there were made when I'd only been making miniatures for a few months, which means that I really, really don't like watching them, ehem.. That did lead me to delete some of them - The sandwich tutorial is one of those that has been requested as a re-upload the most. I'm also thinking of making an addition to this rather short tutorial, showing how to make a couple of different types of toppings. Definitely let me know if you'd be interested in that.

And remember, only a few days left until the deadline of my giveaway :)

-->
Start out by mixing the 2 colors - for the "crust" and the inside of the bread; "white part".
For the crust I took a piece of Fimo Champagne, and mixed in a bit of chocolate brown and orange (only a tiny bit, just to give it a warmer tone). For the white part of the bread I started out with Cernit Champagne - this is a slightly yellow tinted translucent-ish color. I mixed in some fimo white to make it opaque and mixed in a bit of the Fimo Champagne to "cancel out" the white so it wouldn't be quite as light.
Roll the 'white' mix into a log shape and roll out the 'crust' color on one of the thinnest settings on your pasta machine (or just very thin, if you're rolling by hand). Add a layer of the 'crust' color around the white mix and roll it into a thinner log, blending the seems. I used the side of my polymer clay blade to press down onto the log, creating the square shape. Aim for a diameter of approx. 9mm - you can always adjust the thickness by either pushing or stretching the cane.
To give the crust a more realistic baked look, I used a few shades of yellow and brown pastel, and brushed it on randomly.

-->
Cut the amount of slices you want.
1) - Use a toothbrush to give the slice some texture on each of the 4 sides.
2) - Using a fine needle tool, add some detailing around the 'rim'/edge.
3) - Begin adding the texture to the inside of the bread, moving your needle tool in tiny circular motions.
4) - When the entire top surface is textured you can add a few larger holes, just like in a real slice of bread :)

I prefer pre-baking my miniature bread slices for some of my projects - if you're going to make a sandwich it's very helpful as you won't ruin the texture or shape when pressing down the top slice of bread.

you can expect a couple of posts from me this weekend - feel like I'm behind schedule

Monday, December 31, 2012

Tutorial: Cutting boards and knives

Making miniature dollhouse cutting boards and knives (scale 1:12)

As I said in my other post today, I'll be posting a fair amount of tutorials in January to kickstart 2013. You're probably looking at your calender right now, aren't you? thinking; "it's the 31st of December!"... No! I hereby declare this day January the 0st... ehem, so let's get started, shall we? :)

Cutting boards are very easy to make but I have gotten questions about where I get them/how I make them in the past, so I'll be pairing it up with a short tutorial for making knives and hopefully you'll find it useful :)


 Materials needed:
-Wood (explanation below)
-Glue
-Metal sheet (explanation below)
-Saw, metal shears or small lopping shears
-Sandpaper or file
-Acrylic paint if you want :)


If you're interested in my tutorial for making miniature plates click here


1) + 2) - For the cutting boards you'll need some wood. You can use a really thin sheet of wood and cut it out in the size you want, or you can use things like wodden stirring sticks for paint, wide popsicle sticks (at least that's what I call them.. got them from a local craft store) - matchsticks can make some cool looking cutting boards as well. Saw or cut out the boards in the size/shape you want and smooth the edges using some sandpaper or a file.
3) - If you want to add a little extra detail you can use your blade or knife to cut some lines in the surface of the wood. This will make the cutting board look like it's actually been used.
4) - To make the lines stand out, make the cutting board look more worn and just to add a prettier color, I thinned out some dark brown acrylic paint with water and applied it to the wood. As you can see I made a areas darker than the rest - not for any particular reason, I just like that look.
You now have your miniature dollhouse cuttingboard.


-->


5) - For the knife you'll need some sheets of metal. You can find this at hardware stores OR you can use what you probably already have - cans. Try to use cans where the metal isn't too soft (to avoid curly and bent looking knives).
Don't worry if your can has a golden color on one side and silver on the other - if you're going to glue this down to a plate, cutting board or miniature scene this won't matter :)
6) - for the handle you can use polymer clay or wood - I chose wood. For this knife I used a matchstick (toothpicks make great handles as well). You can also use larger wooden sticks to create handles with more detail and curves. I used a file to make the matchstick thinner/more flat, smoother and rounded at one end, then used my clay blade to make a small cut at the other end, where the blade of the knife will be attached.
7) - Cut out a blade for your knife. If you notice, the cutting side of my miniature knife has a 'wavy' look, almost like a bread cutting knife - this is the pattern that my metal cutting shears leave, great for miniature knives! I cut the rest of the knife with a regular pair of scissors (not recommended if you want to be good to your scissors) to get a straight edge.
Glue the handle in place, let dry and paint it if you want. You can add more details, this is just a quick basic knife that'll look cool on your small cooking scenes.

Wednesday, December 19, 2012

Basics: Making polymer clay canes

Basics for polymer clay caning + Pink Grapefruit/Orange/Lemon/Lime cane tutorial

*Tips til at lave frugt-stænger af Fimo/Cernit til brug i miniature og dukkehus-projekter, smykker, dekorationer og meget mere*

Polymer clay caning is probably one of the most popular techniques, you can make canes and beads for use in jewelry, fruit slices or deco for mini food and nail art and so much more. I mainly do fruit and food canes that I can use in my miniature food projects, but I've also made some for my charms. One of my favorite canes I've ever made is my Hello Kitty cane. I actually made 3 with different background colors; pink, blue and green. You can find the tutorial I made for it here: Click here, I've been using this cane to decorate mini cupcakes, mainly.
I often get questions about canes and how to's for avoiding a disorded pattern, crumbly slices and so forth. Hope this post helps. I know the citrus fruit cane is one of the most basic canes you can make from polymer clay, but we all need to go back to the basics once in a while.

I am planning on posting tutorial for other fruit canes on this blog as well, little by little though, :) I'll be making the tutorials as I need to make new fruit slices for myself. This time I needed new grapefruit slices - for my ham that I showed in a previous post (ehem, the ham tutorial has been delayed... havn't had the time to edit it.


-->
Grapefruit tutorial:
I always find a picture ofthe real thing so that I have a refference to work from. For this grapefruit I used a picture from Google.
1) - The colors I mixed for the fruit pulp (from left to right) is; Translucent Fimo red, Translucent Fimo white, Pink Cernit. I also mixed in a tiny bit of red Fimo soft.
2) - Roll and shape into a rather flat cylinder shape.
3) - For the white I mixed about 70% white Fimo with 30% white Cernit, but you can use 100% white from one brand. I added a small amount of yellow.
4) - The thickness of the white layers will depend on the size of the cane you're making. For mine I chose setting #7 on the pasta machine for the inside.
5) + 6) - Devide the pulp into as many sections as you'd like and cover every second slice with the white. As you can see I left some excess clay - push this inwards to help "curve" the edge of the sections.
7) + 8) - After pressing the cane together a bit I measured the white for the outside. For this layer I chose setting #5 on my pasta machine.
9) - for the peel itself I mixed some of the white mix with yellow Cernit and orange Premo.
10) - It's now ready to be rolled into a cane :)
11) + 12) - I rolled mine to an approx diameter of 7-8mm. You now have 2 options; Either bake and slice afterwards, or slice and then bake. The second method is more time consuming, but it also allows you to add texture to the slices. Bake at the temp. on the packages of clay for approx. 5-10 minutes.

Basics/Tips for cane making:
The clay you use: Not all brands of clay are good for making canes - Some brands are more crumbly after baking, so if you want to bake the canes and then cut them afterwards, you need to take this into consideration. Fimo is the brand I find is best for cane making, BUT, I use Fimo, Premo, Pardo and Cernit for my canes. If you've tried cutting a cane and the slices turn rather matte/white, a dap of water or glaze will fix this and refresh the color.
It's a good idea to use clays that are of the same consistency - some that are equally soft/firm.
The height of the cane while working on it is important too. Don't work with a piece that's too thick before it's even been rolled to a cane - this will make it harder to control what the middle will look like; Having a pretty end piece is pointless if the rest of the cane is disorded and crooked. A flatter piece is easier to manage.
Packing the cane: Before you begin rolling out the cane, make sure that there are no holes inbetween the layers, that'll cause the inside to be disorded once pressed together. Fill in all gaps - take your time, don't rush. Most canes can be made into "circles" (eg. Citrus, tomato, my Hello Kitty cane after adding the background), try to get as close to a circle shape as possible to avoid getting a messed up image.
When you're ready to roll out the cane; Begin by lightly pressing on the sides all the way around using your fingers. This will both close any air pockets and extend the cane, making it easier to roll it.
It isn't unimportant how you roll out the cane - don't just roll it slightly back and forth so only half the cane touches the work surface. The cane needs an equal amount of pressure on all "sides".

Saturday, December 8, 2012

Tutorial: Making glass like polymer clay eyes

Making glass like eyes from polymer clay

The method I use + alternatives explained

Did I say something about posting a review?... I have got to stop predicting which posts I'll be doing! Hope you don't mind getting a tutorial instead. This tutorial will be showing you how to create glass like polymer clay eyes to use for your dolls/sculptures or even charms :)
You can buy glass eyes from various websites but they can be quite expensive and I honestly don't want to pay that much! So I thought, "why not make some eyes myself?"..

I don't use these eyes for all my dolls (actually I havn't used them for more than a couple of babies so far. I'm not going to use them for my portrait dolls - I prefer painting those on instead, but I love these especially for babies because then you don't need to worry about painting something that fine and delicate.

Materials needed:
-White and black polymer clay
- Polymer clay in the color of the eye (iris)
- Liquid clay (preferably fimo deco gel)

The method shown is just the way I prefer doing it - I will be explaining a few alternatives to creating eyes as well.
This tutorial will show you how to make the eyes I used for my 'Sour Zombie cupcake pendant', if you want to use them for miniature dolls there are some steps you can skip as you won't need as many details for such a small scale.

Hope you'll enjoy the tutorial :)

*Dette er trin for trin anvisninger til at lave realistiske glas-lignende øjne til dine dukker, skulpturer eller andre polyler projekter. Du kan sagtens bruge Fimo/Cernit til at lave flotte dukkeøjne, fremfor at bruge penge på glasøjne*
-->

1) - Start out by mixing the colors you want to use for your eye. There's no rules as to how many different shades you should work with, the larger the eye you want to make, the more shades you shoul probably use to make it look more realistic (depending on the eye color of course). Take a look at a picture or your own eyes and copy the colors you see. I chose to make blue eyes with green near the pupils.
2) - Roll out each of the colors. They don't need to be the same thickness, sometimes the darker shades will only appear as a very fine 'outline'. Stack them.
Now, if you are going to make eyes for miniature dolls like the baby sculpture I have a picture of above, you can skip the next 7 steps and go straight to adding the pupil. You can also do this if you're going to make larger eyes, but I recommend to follow at least the next couple of steps to get a more realistic effect.
3) + 4) - I'm using the dull site of an exacto knife to push into the clay - making that pattern you see in eyes. You can do as many cuts as you'd like. Using the dull as oppose to the sharp side of the knife helps to "drag" the clay and create a more defined pattern.
5) - To get an even more detailed design I decided to cut the piece into slices, then putting them back together in "zigzags".
6) + 7) + 8) - Push the pieces of clay even closer together. Keep pressing the sides and begin stretching it as a regular polymer clay cane.
9) - Cut the cane into smaller pieces and line them up next to eachother. Make sure that the new piece is long enough to go around the pupil size you want.
10) - Add a log of black polymer clay and wrap the iris color around it.
11) - wrap a few layers of white around it as well and begin rolling out the cane. Roll it as thin as the size of eyes you wish to make. If in doubt you can roll it out, cut off a piece and test the next steps in the tutorial to see what your finished eye will look like, you can always make the cane thinner.
12) - Cut out lots of slices. The thickness you should go for is the approx. height you want your finished eye to have :) Now use your fingers to flatten the edges and making a half circle (dome shape). I used one of my larger ended embossing tools to round of the edges on my tiny doll eyes though.
13) - Don't worry about the pupil or iris not being as round as you want. Of course it's best to get as close to the correct shape as possible, but you can use a rounded tool to push the clay a bit and correct it. If you have a ball tool in the size of the iris use it to press down the clay a bit, so you get a flat top.
14) - Now it's time for the liquid clay. Add a small drop to the top, covering the iris and pupil. Bake for about 5-10 minutes and you're done :) once you've finished your charm/sculpture/piece you can glaze the eye to give it that final touch.

Alternatives:

Though the cane can be made in any size you want, you might just want to make a couple of pairs of eyes or use a different technique. You can as an example make the white dome shape in the size you want and flatten the top. You can then simply paint the iris and pupil on with acrylic paints before ading the liquid clay, this will make awesome eyes as well. Now, there's a method I've thought of, but I havn't tested (and I therefore don't know if it'll burn) but I'm imagining that you could print out some iris-pictures from your computer and place them on top of the flat topped dome shape, then add the liquid clay. If this works it'll save you all the trouble of painting pretty eyes... but I definitely think it's a lot more fun to make them entirely by hand.
For most of the dolls I've made to far I've baked small dome pieces of white polymer clay (without flattening the top), then I've sculpted those into the clay and painted with acrylics after baking - it works great as well :)

Hope you found this useful.
Ask if you have any questions! :)

Sunday, November 11, 2012

Tutorial: Polymer clay plates

Polymer clay plates for miniatures, charms etc.

A tutorial for making miniature plates from polymer clay :) One of my most requested tutorials on my old blog.
*Note, This is just a quick demo - Take your time and make some good plates instead :)

En hurtig trin for trin guide til at lave tallerkener af Cernit/Fimo til miniature eller lignende.

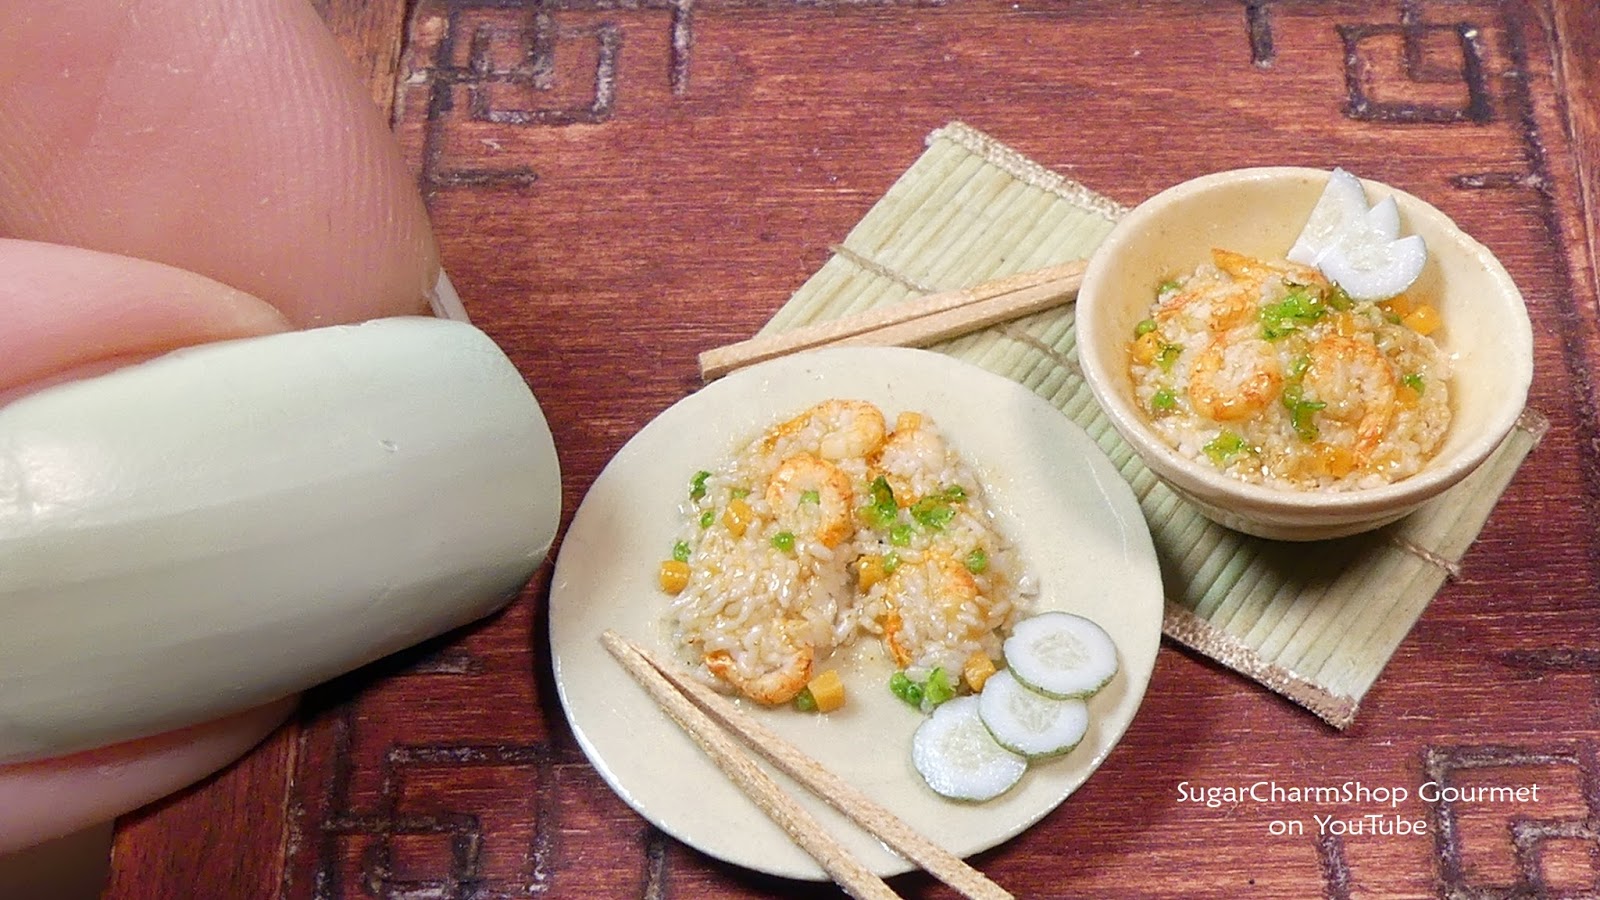
--> When I first started out making miniatures I made my own plates as well. But, as I got more serious about making these tiny food items I began buying ceramic plates from miniature stores (actual stores and online) + ebay. At some point I AM going to make my own ceramics but at the moment there's no way my boyfriend will let me have a 1000○C kiln in the apartment.... So, I prefer buying my plates for now :) - However, sometimes you want a plate of a certain size, shape or color, and a homemade polymer clay plate could work.
I'm been on the lookout for a material that would give me a nice glossy look, and I've found one! But there are different finishes you can add to polymer clay plates, a couple of them are;
1, acrylic paint and glaze - can look really good!, I just wanted something a bit more durable than paint.
2, glaze alone - glaze can give a really nice look, the problem I find is that you have to apply a lot of glaze in order for it to look OK.

The material I've now found is Efcolor cold enamel. It's a powder which melts in the oven. It says "150○C" on the label but I baked my plates at 120○C and it worked just fine...
These powders create (as the name says) an enamel looking finish. The tubes aren't that big, I put them on my computer so you could get an idea of the size compared to the keyboard.

I've already ordered more colors. Would you like to see "swatches" once they arrive? - I know that it can be hard to choose colors just by looking at pictures websites provide you.

Here you can see swatches of the colors I chose in my first order. Left to right: White, ivory, sand, black, light pink.
I didn't try to make it neat, I just poured a bit of powder onto a piece of white Cernit.

-->


As I wrote in the beginning - This is just a quick demo to give you an idea of how I do when making my own polymer clay plates. Take your time and get as good a result as possible.
You can use this technique to make plates, bowls, trays, cups, whatever you want.

Materials you'll need:
-Polymer clay. I recommend white or a color matching the color you want your plate.
-Cookie cutters (you can do it without as well)
-Mold putty (I'm using amazing mold putty)
-Clay cutting blade
-Large ball tool, something that's rounded or even your finger.
-Liquid clay (not extremely necessary but you'll see what I use it for.
-Cold enamel powder (or glaze, paint etc if you prefer that)


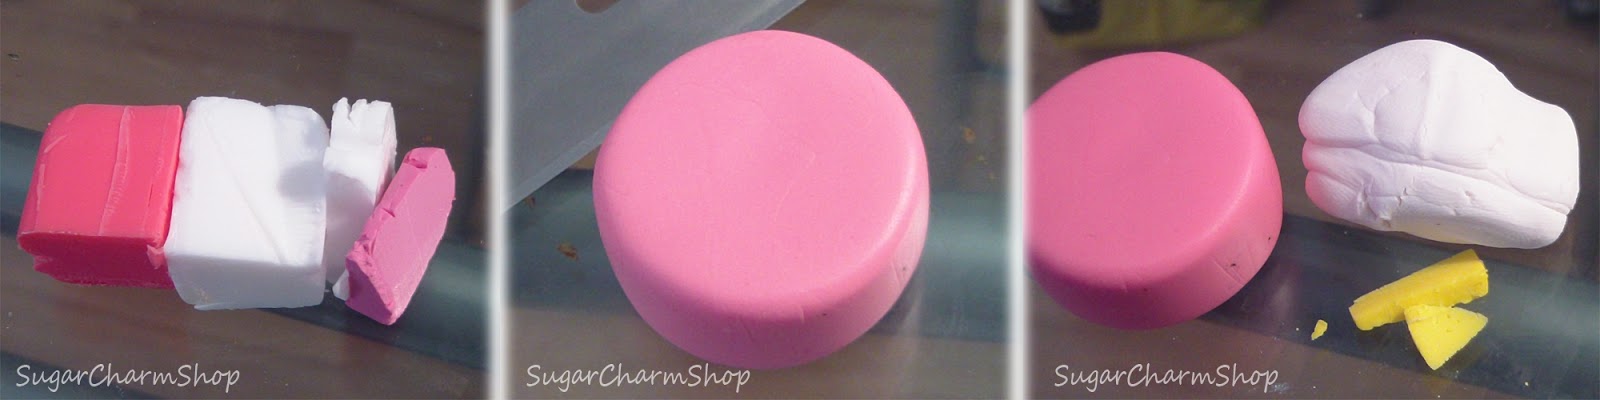
1, There are more than one way you can begin this project. You can roll out a ball of clay and just flatten it with your fingers (which works just as well), or you can roll out a sheet of clay and cut out some circles. - This method is good if you want to have an exact height when making multiple sizes of plates.
2, Round off/smooth the edges to create a flat dome shape. Place something flat (eg. your blade) on the top and press down to get a flat bottom for the plate. Roll out a thin snake of clay.
3, Add the clay snake to the bottom. Use some sort of tool (I'm sorry this isn't mentioned in the material list) to smooth out the clay where the end pieces meet. You now have your basic clay plate :)
4, Bake and let cool. Now make some molds :)
5, Fill up your mold with clay and use the blade to trim off the excess.
6, Take your finger or rounded tool and press press it into the center. You'll need to go back with the blade and trim off clay a few times. Lastly I use my finger to just smooth everything out.
5, make a few plates
6, Now, you can either work on a piece of paper, pour on the powder, and pour the excess powder back into the bottle, or you can put the powder into some other container. I chose the last option :) The jar shown contains powder from just 1 bottle so there's definitely product enough for many projects.
7, I added some liquid clay to my fingers and spread it on the plates, then dropped them in the jar and used tweezers to turn it. You're supposed to drizzle the powder on top of a project but I thought this would be a good way of doing it :) Try to get an even coating. Even though it smooths out a bit in the oven you'll be able to see bumbs if it's applied unevenly.
Bake them and you're done! :)