
Basics for polymer clay caning + Pink Grapefruit/Orange/Lemon/Lime cane tutorial
*Tips til at lave frugt-stænger af Fimo/Cernit til brug i miniature og dukkehus-projekter, smykker, dekorationer og meget mere*
 Polymer clay caning is probably one of the most popular techniques, you can make canes and beads for use in jewelry, fruit slices or deco for mini food and nail art and so much more. I mainly do fruit and food canes that I can use in my miniature food projects, but I've also made some for my charms. One of my favorite canes I've ever made is my Hello Kitty cane. I actually made 3 with different background colors; pink, blue and green. You can find the tutorial I made for it here: Click here, I've been using this cane to decorate mini cupcakes, mainly.
I often get questions about canes and how to's for avoiding a disorded pattern, crumbly slices and so forth. Hope this post helps. I know the citrus fruit cane is one of the most basic canes you can make from polymer clay, but we all need to go back to the basics once in a while.

I am planning on posting tutorial for other fruit canes on this blog as well, little by little though, :) I'll be making the tutorials as I need to make new fruit slices for myself. This time I needed new grapefruit slices - for my ham that I showed in a previous post (ehem, the ham tutorial has been delayed... havn't had the time to edit it.
Grapefruit tutorial:
I always find a picture ofthe real thing so that I have a refference to work from. For this grapefruit I used a picture from Google.
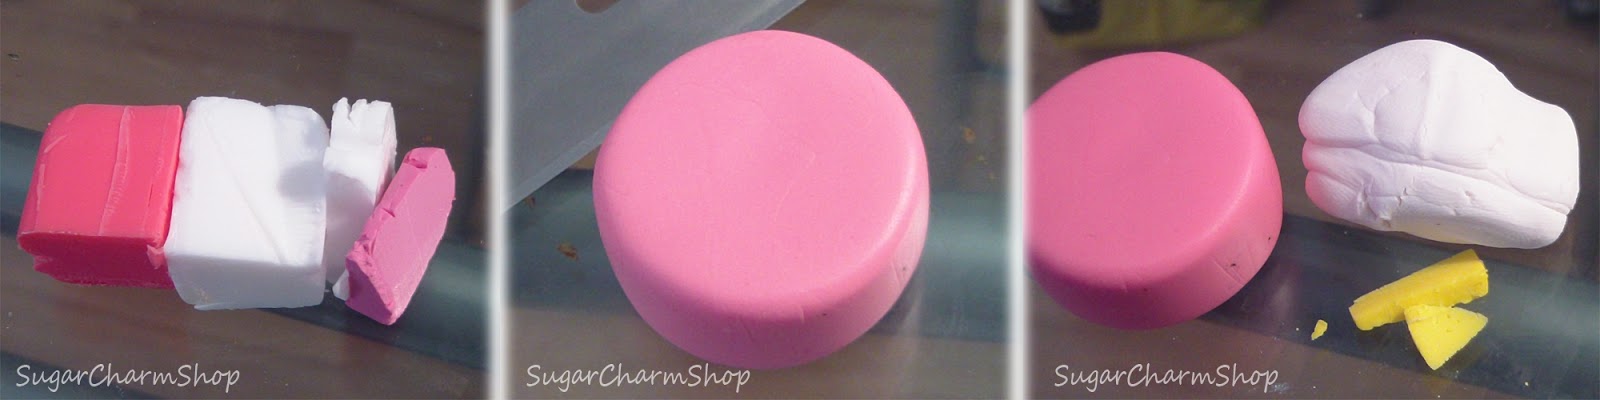
1) - The colors I mixed for the fruit pulp (from left to right) is; Translucent Fimo red, Translucent Fimo white, Pink Cernit. I also mixed in a tiny bit of red Fimo soft.
2) - Roll and shape into a rather flat cylinder shape.
3) - For the white I mixed about 70% white Fimo with 30% white Cernit, but you can use 100% white from one brand. I added a small amount of yellow.

4) - The thickness of the white layers will depend on the size of the cane you're making. For mine I chose setting #7 on the pasta machine for the inside.
5) + 6) - Devide the pulp into as many sections as you'd like and cover every second slice with the white. As you can see I left some excess clay - push this inwards to help "curve" the edge of the sections.

7) + 8) - After pressing the cane together a bit I measured the white for the outside. For this layer I chose setting #5 on my pasta machine.
9) - for the peel itself I mixed some of the white mix with yellow Cernit and orange Premo.

10) - It's now ready to be rolled into a cane :)
11) + 12) - I rolled mine to an approx diameter of 7-8mm. You now have 2 options; Either bake and slice afterwards, or slice and then bake. The second method is more time consuming, but it also allows you to add texture to the slices. Bake at the temp. on the packages of clay for approx. 5-10 minutes.
Basics/Tips for cane making:
The clay you use: Not all brands of clay are good for making canes - Some brands are more crumbly after baking, so if you want to bake the canes and then cut them afterwards, you need to take this into consideration. Fimo is the brand I find is best for cane making, BUT, I use Fimo, Premo, Pardo and Cernit for my canes. If you've tried cutting a cane and the slices turn rather matte/white, a dap of water or glaze will fix this and refresh the color.
It's a good idea to use clays that are of the same consistency - some that are equally soft/firm.
The height of the cane while working on it is important too. Don't work with a piece that's too thick before it's even been rolled to a cane - this will make it harder to control what the middle will look like; Having a pretty end piece is pointless if the rest of the cane is disorded and crooked. A flatter piece is easier to manage.
Packing the cane: Before you begin rolling out the cane, make sure that there are no holes inbetween the layers, that'll cause the inside to be disorded once pressed together. Fill in all gaps - take your time, don't rush. Most canes can be made into "circles" (eg. Citrus, tomato, my Hello Kitty cane after adding the background), try to get as close to a circle shape as possible to avoid getting a messed up image.
When you're ready to roll out the cane; Begin by lightly pressing on the sides all the way around using your fingers. This will both close any air pockets and extend the cane, making it easier to roll it.
It isn't unimportant how you roll out the cane - don't just roll it slightly back and forth so only half the cane touches the work surface. The cane needs an equal amount of pressure on all "sides".
I really like to see how you made the Hello Kitty cane. :)
ReplyDeleteThe link to the video is in the post :)
DeleteThese canes are beautiful!! I love the colors!
ReplyDeleteHow long do you bake the cane before you slice it? What temperature?
What do you slice it with?
As written in the post - bake according to the package of the clay and for 5-10 minutes :)
DeleteHow do you stop the canes from distorting when you cut them before they're baked?
ReplyDeleteCheck out my newer post here: http://www.scs-craft.com/2013/05/dollhouse-mixed-projects-more.html
DeleteNear the picture of the tomato cane I'm explained how to cut an unbaked cane :)
Thank you soo much for this! I really needed to know how long you were supposed to bake the canes and you were the only person who would tell me!
ReplyDeleteI noticed some numbers on a few pictures, like #5 and #7. I wonder what they are for :)
ReplyDelete